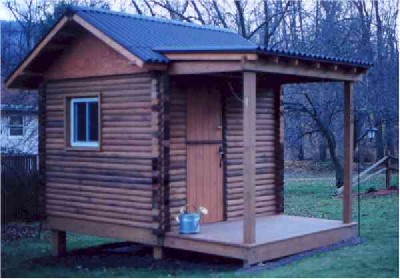
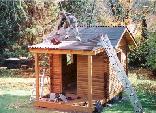
 Need more storage space but you don't want to buy a cheap plywood or metal shed? Do your kids trash the backyard with scraps of lumber that they call a fort? The log cabin shown to the right is the product of several months of weekend labor to provide a solution to those questions. This page outlines the steps, if you are considering a similar project.
When I retired from the Army, we bought a house on a quarter acre lot in central Pennsylvania. It was our first home, after years of moving between rental properties and government quarters. My daughter was too big for her plastic Little Tikes playhouse. She realized the permanence of this last move and requested her own place in the backyard. I've been called a procrastinator; heck, I'll be the first to admit it (...tomorrow, of course). So by the time I got around to the playhouse project, my daughter was already 11 years old. With teenage years just around the corner, I didn't want a structure that would be abandoned in the near future. We compromised that it would also double as a storage shed in the winter, for bicycles and other summertime items; the terms of my daughter's lease would be a seasonal timeshare.
We searched the web and local retail outlets, but I wanted more than the standard 2x4 and T-111 siding construction. I wanted a unique building, that would last and add value to the property. During my tours in Germany, I had seen small hand built garden sheds in their community gardens. Many Germans would use them as their weekend retreats; some were even outfitted with bunks, sinks and small stove units. Here in the United States, we had stayed once at a KOA campsite in a small pre-fabricated log cabin with a small porch. We found similar kits and some pre-built, but either pricing or inferior materials ruled them out.
Driving for a visit to the in-laws' home in a neighboring county, I spied a small playhouse constructed of landscape timbers. It was much too small for my dual-use intentions, but it started an idea. Two weeks later we were shopping at Wal-Mart and their garden shop had posted a sign advertising 8' landscape timbers at $1 a piece. I went home and did some quick estimates of area coverage. Later that evening, I returned with my son in our pickup truck and bought 96 landscape timbers. (It turned out, according to the frustrated manager, who approached us as we finished loading, that the stack of timbers had been mispriced. But an advertised price is a price....) We took the landscape timbers home and stacked them on scrap wood in the garage, raised off the concrete garage floor. I bound them in a large bundle with ratchet-type web strapping, to delay warping or twisting.
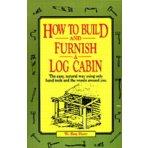
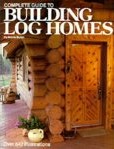 I had done some remodeling and deck work, but this was my first building project of this scale. I searched for books on log cabin construction and found a book called the Complete Guide to Building Log Homes by Monte Burch. Intended for use in full size log cabin construction, I was able to use many of the illustrated building techniques for my shed. This book became my Sears Christmas catalog for the project. Reading the book before bedtime, each chapter would give me new features to incorporate. My wife, who oversaw the project budget, quickly dispelled any dreams of dormer windows or cedar shingles. She also demanded that the shed be completed before my daughter's twenty-first birthday.
I reviewed select passages and scratched out rough plans. Being somewhat familiar with local codes, I contacted the zoning and building inspection offices for their requirements. The zoning guidelines were that the shed must be at least 3 feet from any property boundary. The county building code allowed for a 10'x 15' structure, less than 10' high, without requiring building inspections. To minimize cutting, I had already chosen 8'x8' as my outside dimensions. Even with the addition of a 4 foot porch, I wouldn't be subject to inspection, unless I chose to install electricity in the structure.
 The first step was to layout the building site. Since the shed would be used for seasonal storage, I did not worry about a convenient location near the house. I preferred, in fact, to place it away, in order to reduce noise from playing children. This would also enhance the illusion of a homestead, independent of our house. Our house is set into a hill, with the lot radically sloping away to the rear; we had long considered the back half of our lot as the "flat". During an earlier project to mark our boundary corners with hewn posts and split rails, we found that this "flat" also had a slope, although less steep. To allow for watershed past the new structure and levelness, we would have to raise the foundation. We could bring in shale and compact it into a pad, on which we could build it with a skid foundation. Or we could build a deck just above the ground. Since the steep slope near the house would preclude truck access in order to dump shale, I chose the latter method as a foundation.
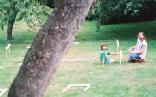
We stretched a line between the fence posts at the corners of the lot. Measuring six feet away from this line for the backside deck posts, we used batter boards and string to mark a 7'x7' square, where the strings intersected. (It's very important to make sure you use batter boards and keep your string level. If you measure and mark directly on uneven ground, your dimensions will be wrong.) These intersections marked the location of the outside corners of the 6x6 pressure treated posts for the deck. This would allow for a six inch overlap of the landscape timbers, since we had discussed notching them to give a true cabin look. We dug the post holes in a day, going well below the frost line to prohibit the foundation from heaving in the cold climate later.
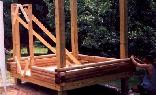
 We mixed concrete footers for the poles, using two bags for each hole. Once the concrete set, we placed the posts in the holes and braced them with 2x4's, after careful alignment with the string and measuring diagonally for squareness. Then we filled the holes with more concrete to within six inches of the surface. After a day for the concrete to set, we filled the remainder with dirt, creating a mound to drain the water away from the posts. Before starting on the deck frame, we covered the ground with a double layer of landscape fabric to inhibit weed growth under the cabin. The frame consists of a pair of 2x8's on two sides and 2x6's on the other two. We sandwiched two boards together, attaching to the deck posts with lag screws. This provided sufficient width on which to rest the landscape timbers. The frame boards were lined up at their bottom edge. In that way, the 2x6's created a natural drop required for the notched timber log walls. We hung 2x6 floor joists and staggered braces perpendicular to the joists. Once the plywood floor decking was in place, I constructed a door frame out of 2x4's, bracing it to keep it plumb over the weeks of construction. (Except for the roof frame, I chose pressure treated lumber throughout the building for protection during the weeks it would be exposed to the elements.)
 Once the deck was finished, I secured the first logs with lag screws to the deck frame and posts. This was the point of no return and the decision that would cost me the most time in construction. In order to keep the traditional log cabin look, we decided to notch and overlap the timbers. This caused us a lot of time per landscape timber, scribing, kerfing, chiseling, fitting and securing. If I had to do it all over again, I'd probably use overlapping butt joints, without notching; I would have saved a month of weekend work easily. But at the time, we were thinking esthetics, not labor. Even with power tools, it was labor intensive and we found a deep respect for the early pioneers who built log cabins with nothing but axes and handsaws.
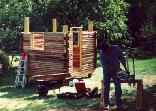 After marking the width of the landscape timber upon which the log would rest (a process called scribing), I would make kerf cuts with a circular saw. Then we would clean out the scrap with a chisel and make diagonal cuts with a handsaw to better approximate the shape of the timbers. It could take several fittings and adjustments before we had a good match. Sometimes I would use a belt sander (the poor man's planer) to smooth out warps and twists so the timbers would lay more directly on one another, reducing the need for excess chinking. In addition, we used pipe clamps to hold the timbers down tight to one another when we fastened each timber using pole barn nails, spaced about 16" apart. Every third row, we would drive a pole barn nail into the 6x6 posts to provide additional support, besides that given by the deck frame.
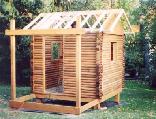 With the log walls in place, it was time to start framing the roof. Since two sides were lower than the others, we secured boards to even things out. Then I trimmed the waste portions of the 6x6 poles with a chainsaw. Once they were flush with the structure, I secured plate boards to the front and back, ensuring that they also rested on top of the 6x6 poles. This would transfer some of the roof weight load directly onto the posts, rather than being fully supported by the timber walls and decking. With those boards in place, it was time to install 2x4 rafters and a ridge board. Before we could finish the roof, however, we were back on dig detail and framed out the small 4'x8' attached porch. Starting with the porch section, we attached plywood to the whole roof.
 We applied flashing to the section where the porch met the main roof. Then we laid roof felt to provide protection for the Ondura roofing sheets that we chose instead of shingles. From a distance, it looks like painted, corrugated tin but is actually a more flexible, composite material. This comes in handy when, no matter how hard you tried, the roof isn't quite square. Ondura can be pulled or pushed to line up correctly with a roof edge. It is strong enough to stand on, but it is advised to place your feet perpendicular to the peaks to distribute the load. For attaching to the plywood, there are special nails with gaskets to seal the heads; they are driven into the Ondura's peaks, not the valleys, to prevent leakage. I covered the backside of the cabin roof first, so I could have access from the front over the peak without worrying about sliding off or damaging any Ondura. Then I covered the porch roof, in order to overlap with the Ondura from the main front section. Ondura also provides ridge cap sections to finish it off. Finally, I caulked all seams, for additional protection, in case of snow or ice.
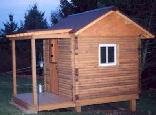 We found some 24"x24" single-pane slide windows for $40 a piece at a local builders' surplus store. The Dutch door I made with 2"x3" framing and covered with tongue & groove pine. I used gate latches and hinges for the door hardware; another gate latch is on the inside to hold the two halves together. There's a dead bolt on the upper half to provide security for items stored inside during winter. I nailed vent material between the rafters to prevent small rodents from inhabiting the space. Since the project consumed more weekends than I originally planned, I ran out of good weather for further work. Next spring we will apply caulking/chinking to seal the small gaps between the timbers. I also have to build a bunk bed and install shelving for more storage. But the final detail work will be my first spring project. That is, unless my wife convinces me to finally start digging that goldfish pond she's been wanting...
We will be offering plans of this project for sale. If you wish to be notified when they are available, please contact us.

 Need more storage space but you don't want to buy a cheap plywood or metal shed? Do your kids trash the backyard with scraps of lumber that they call a fort? The log cabin shown to the right is the product of several months of weekend labor to provide a solution to those questions. This page outlines the steps, if you are considering a similar project.